Sunday, February 24, 2013

Little Tracks Quilt


Last week I finished up the baby quilt I'd been working on.  With all the swirls and floral motifs in the fabrics I decided on large open stippling for the quilting.  It's been several months since I last stippled, but luckily it didn't take too long to get back into the rhythm of it and I was pretty happy with the results.


Most of the fabric in the top was given by quilt guild members for charity sewing; the remainder of fabric needed for the top plus backing and binding were from my stash.  This little quilt finishes at about 32"x41".  


I don't normally name my quilts, but this one felt natural - I used this cute little bird print for the backing and the quilting lines ended up looking like wandering bird tracks.

Friday, February 22, 2013

Sunday Skirt

This past weekend involved working from home Friday night and a long day at work Saturday, leaving little time to work on a planned birthday present (a skirt) for a birthday party my daughter was attending on Sunday.  I thought for sure we'd end up at the store picking something off the shelf, but as it turned out I woke up a bit early on Sunday and thought...if I start now, I'll still have time...

With a cup of coffee in hand I slipped into my craft room and got to work.  Mornings are my favorite time in there.  The windows face south and east, so there's lots of wonderful sunshine coming in that time of day.


I already had the fabrics sitting out and had ironed the main fabric.  I'd also read through the directions on the pattern a couple times in previous days, so I was able to do a quick re-press on the fabric and get cutting.


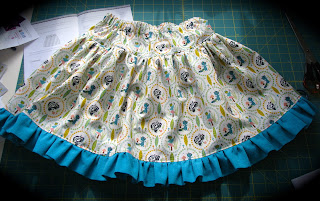
I used this cute wood-animal print and a coordinating shot cotton I had purchased last year, originally intending to make my daughter a light jacket.  Knowing I just wasn't going to end up using the fabric that way, I was excited to be able to use it here.  It's such a cute print and perfect for kids clothes.  I had just enough fabric to make my daughter a skirt as well so we had planned for matching skirts for her and her friend.

The pattern I chose was Addie Jo Skirts by Izzy and Ivy Designs.

The great thing about this pattern is that you get five different skirt variations in one pattern!  The pattern itself does not contain full explanations for all techniques, so I might not recommend if this is your first piece of clothing.  But if you've sewn a couple of other clothing items the instructions are simple and straightforward.  For this skirt I went with View C.


One of the things I wasn't sure about is that they have you cut four pieces for the bottom ruffle; I wondered if I should have just cut two longer strips, but when it came time to match up the ruffle with the skirt seams I was so happy to have those two extra seams to guide my pinning.  It was much faster than having to do additional marking to make sure that the gathered ruffle was lined up correctly.

Just in time I got the elastic in and finished up the last stitches.  My husband was such a great and willing helper, getting my daughter ready so that I could finish up sewing.  I snapped a couple quick pics and we wrapped it up (along with a girly lego set to go with it) and headed to the party.  I love gifting handmade items and even though it was a bit of a challenge to get it done in time, I'm so glad I did.  My daughter was really looking forward to giving the skirt as a gift and I felt good using and giving purpose to some of that fabric that had been languishing on the shelf.

Here's a look at the finished skirt:

And a closer look at the waistband.  I used white thread for topstitching near the blue ruffle, but used a blue-green variegated thread for the topstitching around the waistband and the elastic casing:

The fabric pieces for the version for my daughter are cut out and pinned; planning to sew that up with her this weekend.  Hurray for more finished projects!

Linking up with Finish it up Friday.

Monday, January 28, 2013

Looking back...looking ahead

It's still January, so I figure there's still time for me to write this post - looking back at 2012, and looking ahead to the rest of 2013.  (This one's mostly words, but I've put in a few pictures for fun.)

2012 was a good sewing and quilting year for me. I spent much more time sewing at home on my own, and much less time sewing socially. Our quilt guild stopped meeting, and sewing nights at my local quilt shop also ended early last year and didn't start up again in the fall. So I found myself home a lot more, and it turns out I get a lot done when I'm focused and working on my own. While I definitely like going out to sew with friends, I also love working on my own. It fills me up to have that alone time and just sink into whatever I'm working on, and I've really liked having more of that time in the last year. Sewing at home also has the great time-saving benefit of my area already being set up, so I don't have do all that packing and unpacking and lugging things in and out of the car, not to mention saving time on driving.


I finished quite a few projects; some of them had been in progress for ages and it felt good to cross them off the list. I also evaluated all my WIPs and where I was at, and decided to let some of them go. I cleared out some fabric by participating in a garage sale through a quilt shop. It felt good to let go of those things, to focus on projects that I was interested in and put effort into finishing things that I was excited about...I'm still working on that this year.  I also went on my first bus hop and attended two weekend retreats.

My list of finishes for 2012 includes:


I thought about skipping out on this year's block-of-the-month program at my local quilt shop because I don't really need another project on my list, but it's now the one time a month that I'm there and I like hearing about what's going on at the shop and around the region. My mom and I go together and I bring my daughter as well - my daughter and I have a lovely ritual of stopping for a donut on the way for breakfast and some nice time talking in the car together. So I decided to participate for another year (runs September - August). The BOM quilt is always very traditional and with this quilt and the one before it, the quilt blocks are at a more advanced level. I decided to do more leg-work up front and figure out how to make this quilt more "me", so that I'd be more excited and more likely to put in the time needed each month to make the block. I'll do a separate post on more of that process, but in general so far I'm glad to be making the quilt and happy with my choice.


Looking back at 2012 I was very happy with the work I'd gotten done, and how many projects I'd brought to completion.  As I started looking ahead to 2013 though I felt a little overwhelmed.  I tend to have lots of projects in process at one time, and I'm always getting new ideas of projects I'd like to start.  This makes it difficult to finish things.  Looking objectively at the sheer number of things I'd like to do this year is a bit of a downer as there's no way I'd be able to finish them all, even if I was home sewing full-time! :) So, I've had to do a bit of thinking on how to find balance between working on some of my existing works in progress, finishing things, and still having time to start new things, because one of my favorite parts of quilting is the planning and then pulling and mixing fabrics, and I want that to be a part of my year.  I'm working toward having a smaller fabric stash at the end of the year than I do now, and I'm also hoping to take a few classes this year - not to add any more projects to my list, but to learn new skills.

So far I'm off to a good start; I've completed a couple more WIPs since the first of the year, made a few small things, started and completed a quilt top, and started a new quilt that I'm super excited about. I've also signed up for a quilt class that will be held in March. While I might not be able to keep up this pace each month, I am hoping to keep up this balance - and to do more blogging as I have lots of projects that I haven't talked about here yet.  Hoping to get back on track and share those more regularly.

Here's to looking forward to a year of fun (and productive) sewing!

Saturday, January 26, 2013

A quick finish

Last night I had some sewing time, and wanted something easy and relaxing; so I pulled out a stack of blocks I had set aside for a baby quilt (intended for donation).


I had already had all the blocks cut, laid out, and pinned into neat little stacks, so after a short evening of sewing I now have this fun little top done:


Thinking I might try to get this one quilted and finished up this weekend...we'll see.

Linking up to Finish it up Friday this week.

Friday, December 28, 2012

2012 Project Wrap-up: Little Red Riding Hood Cape

There are a number of projects I've completed this year, but haven't gotten around to posting.  I thought it would be fun to wrap up the year by going through that completed list and sharing the rest of those projects over the next few days.

For Halloween this year my daughter decided she wanted to be Little Red Riding Hood.  Turns out this is a great costume idea, as the costume itself is fairly simple to make, and it's so easy to put on and take off - perfect for a 3 year old. I used the Little Red Riding Hood Cape pattern from LIttle Things to Sew.  The pattern sizes in the book are listed as 0-4 and 5-10.  I went with the 5-10 size, as I wanted the cape to be a little longer than shown in the book, and with using good-quality (read: expensive) wool, I really wanted it to be big enough to last a few years.


I picked up my fabric at Treadle, a pretty dark red melton wool for the outside, and some beautiful voile from Tula Pink's The Birds and the Bees for the liner.  The staff at Treadle are so knowledgeable and helpful; I hadn't sewn with wool or voile before, and was a little nervous about the durability of the voile.  They suggested maybe using flannel with the voile as I didn't really want to use interfacing.  I ended up really liking using the flannel; it added some extra warmth and weight to the cape, and I realized after I was working on it that I was really happy I had that extra layer as the voile is thin enough that the voile would have looked considerably darker if directly backed by the dark red wool.


I loved sewing with wool, and once again found myself so thankful for those Clover Wonder Clips.  They are a must when sewing bulky layers - they easily hold everything together without distorting, and are very  easy to put on, take off, and adjust.  I definitely recommend getting the large box! :)


The cape turned out beautifully and has been getting regular use since Halloween.  It's been just as fun to wear on our weekend outings to run errands as it has for special occasions.

Wednesday, October 31, 2012

June's Quilt - Blogger's Quilt Festival

I am so glad to finally be participating in the Blogger's Quilt Festival.  I have been so excited to share this quilt.


Blogger's Quilt Festival Stats:
Quilt measurements: Approx. 46"x46"
Special Techniques: Hand Applique, Hand Quilting
Quilted by: Me! :)
Best Categories: Baby Quilt, Applique Quilt, Hand-quilted Quilt

I made this quilt for my daycare provider's new baby girl.  I started while she was still pregnant, talked to her best friend to stay in the know on the baby's room colors - yellow, hot pink and lime green, and started pulling from my stash and planning.  I based the center dresden plate off Anna Maria Horner's Center of Attention Quilt in Handmade Beginnings.

I also liked the scrappy background Anna Maria had used in her quilt.  I pulled all the pale yellow and gold fabrics I had and figured out measurements to exactly use up all the fabric in each fat quarter of the background fabric.  I decided to do the same bright scrappy mix of colors for the inner border, and for the binding.  I love the way everything radiates out from the center of the quilt, a perfect spot for admiring a new baby.


I hand-appliqued the dresden plate and then hand-quilted the quilt. The hand quilting on the dresden plate took quite a while and was a bit tough to get through all those layers, but it was worth it.


This quilt took me months to complete.  It traveled with me in the car on road trips and commutes to slowly work on the quilting. I used a mix of orange, green and pink variegated perle cottons for the quilting of the dresden plate and the inner border to mimic the mix of fabrics.  The radiating lines of quilting on the yellow background was done with a cream perle cotton to blend in.


I'm also really pleased with how the back of the quilt turned out.  I designed it to mimic the front, planning out my quilting in advance to make sure the back would still look good and the quilting would fit the design of both the front and back of the quilt.

Lots of memories wrapped up in this quilt.  It was a little hard to give away, but it went to one of the sweetest little girls I know.


Friday, October 26, 2012

Crewelwork - Progress

While sitting in waiting rooms over the last couple days I finished up letters "L" and "M" on my alphabet sampler.  I like the rhythm of working on hand projects like this; the slower pace is relaxing and there's a certain satisfaction in each little stitch, but it's also nice to make / see progress.  I'm now halfway done!


Linking up with Finish it Up Friday; liking linking up with this as it's good motivation to get things done!