This past weekend involved working from home Friday night and a long day at work Saturday, leaving little time to work on a planned birthday present (a skirt) for a birthday party my daughter was attending on Sunday. I thought for sure we'd end up at the store picking something off the shelf, but as it turned out I woke up a bit early on Sunday and thought...if I start now, I'll still have time...
With a cup of coffee in hand I slipped into my craft room and got to work. Mornings are my favorite time in there. The windows face south and east, so there's lots of wonderful sunshine coming in that time of day.
I already had the fabrics sitting out and had ironed the main fabric. I'd also read through the directions on the pattern a couple times in previous days, so I was able to do a quick re-press on the fabric and get cutting.
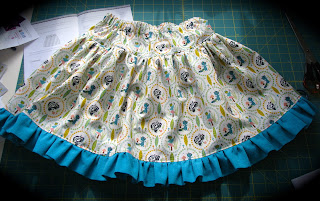
I used this cute wood-animal print and a coordinating shot cotton I had purchased last year, originally intending to make my daughter a light jacket. Knowing I just wasn't going to end up using the fabric that way, I was excited to be able to use it here. It's such a cute print and perfect for kids clothes. I had just enough fabric to make my daughter a skirt as well so we had planned for matching skirts for her and her friend.
The pattern I chose was Addie Jo Skirts by Izzy and Ivy Designs.
The great thing about this pattern is that you get five different skirt variations in one pattern! The pattern itself does not contain full explanations for all techniques, so I might not recommend if this is your first piece of clothing. But if you've sewn a couple of other clothing items the instructions are simple and straightforward. For this skirt I went with View C.
One of the things I wasn't sure about is that they have you cut four pieces for the bottom ruffle; I wondered if I should have just cut two longer strips, but when it came time to match up the ruffle with the skirt seams I was so happy to have those two extra seams to guide my pinning. It was much faster than having to do additional marking to make sure that the gathered ruffle was lined up correctly.
Just in time I got the elastic in and finished up the last stitches. My husband was such a great and willing helper, getting my daughter ready so that I could finish up sewing. I snapped a couple quick pics and we wrapped it up (along with a girly lego set to go with it) and headed to the party. I love gifting handmade items and even though it was a bit of a challenge to get it done in time, I'm so glad I did. My daughter was really looking forward to giving the skirt as a gift and I felt good using and giving purpose to some of that fabric that had been languishing on the shelf.
Here's a look at the finished skirt:
And a closer look at the waistband. I used white thread for topstitching near the blue ruffle, but used a blue-green variegated thread for the topstitching around the waistband and the elastic casing:
The fabric pieces for the version for my daughter are cut out and pinned; planning to sew that up with her this weekend. Hurray for more finished projects!
Linking up with Finish it up Friday.


visiting from finish it up friday. I love the skirt. Your daughter would look great at the party
ReplyDeleteThank you!
DeleteDarling skirt! How fun and you got it done just in time yipppee!!
ReplyDelete